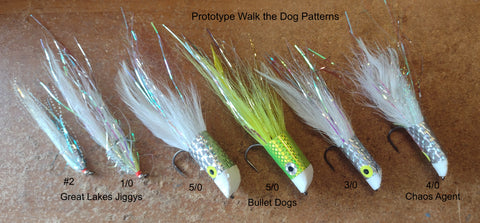
I have been working for over a decade on getting a good walk the dog action into surface and sub surface flies. I've got it with this Bullet Dog pattern.
On this kind mid November afternoon, I made one last trip to Point Mouillie SGA hoping to get another top water shot at some of the big Pike and Bass in the shallow weedy water there. The lily pads and cattails are all dead. I started in a narrow pass that holds big fish. The water was muddy from all the duck hunters motoring back and forth through there. I could not get anything to come up for the big 5/0 Chartreuse Bullet Dog on the surface. I changed over to a 6 inch 1/0 flashy White Great Lakes Jiggy pattern and got nothing. As I paddled on to the next spot I had not seen a single bait fish in the shallows.
I paddled over shallow weedy flats and saw some baitfish, then more small fish in shallow pockets among scattered Phragmites grass patches. I tucked the kayak in behind the down wind sheltered side of a solid phragmites wall. I cast the G.L. Jiggy back toward the cover edge and stripping it back. About 30 feet down that edge, it stopped with a jolt and I tightened up the head shaking of a somewhat lethargic 20 inch pike. After landing a smaller pike, thirty feet further down that edge,I had finished a retrieve and let the fly fall to the bottom to reposition the kayak against the wind. I tightened up to find a heavy weight that began to move slowly at first before picking up speed and spinning the kayak around. It was a 26 inch Pike. I had no cell phone for the picture. I also hooked a heavy fish. When I pulled it toward the surface, she turned and powered away and the hook came free. Form the looks of her wide tail and back end she looked like one of the really big bass that live here.
Here is a Pike similar to the two big pike I got today. This one came to a 4/0 Musky Banger.

At the next channel I had two more active pike come quickly to the Jiggy so I switched to a 5/0 White Bullet Dog top water. I fish it in short sharp rips so it tears up the surface and darts randomly left, right or down. A big pike jumped it in an aerial strike and was only hooked for a second. Average and small Pike were blasting it on the surface regularly and I got a sluggish 19 inch bass. I could hear pike blasting baitfish back in the Phragmites cover. I got a pike that measured 28 inches and an then18 inch bass that took the fly gently as it floated 10 feet out while I was re-positioning my kayak against the wind.
I finished with 3 pike on the 1/0 Great Lakes Jiggy while also loosing a big bass. On the 5/0 White Bullet Dog, I got about 6 pike 17 to 28 inches, many more missed pike hits and 3 bass landed 19, 18 and 14 inches.
All the pike I have landed my first late summer-fall season here looked like slender males or immature fish, no hefty females. Some very big Pike have hit and missed my Banger poppers and now this Bullet Dog lure.
Here is one of the larger bass that are common here similar to the two I got today Surface Ripping the 5/0 Bullet Dog. Most have come marching poppers across the surface in a steady rhytym of medium pops. This bass pictured came Surface Ripping a 4/0 Chaos Agent on the surface.

I am finding a "Surface Ripping" retrieve works well with the Bullet Dogs and the Chaos Agent. This is very sharp, short rips then a pause for the fly to return to the surface and start the next rip just as the fly is bouncing back to the surface. This produces a range of popping-chugging-slashing noises, random sideways or downward darting movements, lots of surface disturbance and Low pitch and Infra sound stimulation for the fish's lateral lines.
I would never rip a popper this violently but instead usually march them steadily across the surface with medium sized pops that throw a bit of water up. If they want pauses or a softer retrieve I will go to that. To get a missed strike to come back, I will frequently try a quieter, slower and easier to catch retrieve.
After a couple of hours surface ripping the Bullet Dog, I find the rhythm and touch (shorter, quieter, but snappy) to get that side to side walk the dog action. That is a good move to lure a missed hit fish back. It can be paced quicker to run inch or two below the surface or slower on the surface. Tthe Surface Ripping seems the better retrieve in general.
Walk the Dog is: a side to side darting action when a lure is fished with short, sharp rhythmic jerks. Flies are much lighter and depend on the water trapped inside them for the needed momentum. Casting lures do it easily by having the center of mass behind the fluid dynamic center. (Where the sideways forces push on streamlined shape moving at an angle of attack.) The Bullet Dog uses these forces and its shape also feeds into the sideways curving path it takes.
- Bullet Dog, Walk the Dog Design Elements:
- Using a River Road foam cylinder slice length wise 1/5 off to make a flat side, this is the top of the heads. The front face curve transitions smoothly into the flat top to keep the curved fluid flow attached. The curved face causes the moving fly to Curve toward the hook gap.
- The Streamlined shape and smooth surface of the head and skirt has low water resistance so the fly glides farther along its curved path.
- A sharp side angle jerk to the low hook eye causes the fly to Roll on its side. The "D" shaped cross section also causes it to roll to the side so the curve motion of the jerk brings it around to going back the opposite direction.
- As the fly glides to a stop, the low weight of the hook rolls the fly back to vertical where the next jerk will roll it and send it curving back to the other side.
- The foam head only goes back 1/4 inch into the Hollow Prism Tape Skirt. The Mass of Water inside the hollow skirt makes momentum to carry the fly farther through the curved path.
- The rearward mass of the water in the skirt VS the light foam head forward makes for a rearward center or gravity which tightens the fly's curved path. (Like putting the heavy arrow point at the back of the arrow) The light foam head is easily pulled inward by its curved face
- The sleek tail materials let the fly glide further forward along its curved path.
- Water Friction with the tailing materials slows the fly's glide along its curved path. So streamlined tail material make for more side to side action.
- More weight rearward like lead tied to the hook bend or putting lead in its nose would increase its angular (rotational) momentum. This rotational momentum is key to getting casting lures to make wider turns with each jerk.
The Bullet Dog Evolved from the simpler Silver Bullet pattern which used a round foam cylinder to shape the head and hollow skirt, The Bullet dog has more action and keeps that "cast like a bullet" virtue. It takes more work to shape the flat top head and curved face.
- Bullet Dog Pattern Materials
- Hook: VMC 7250BN Spinner Bait Hook 5/0 to 3/0, maybe smaller
- Head: Shaped River Road Cylinder, see detail below for Head & Skirt
- Skirt: Prism Tape, Silver for White fly, Chartreuse for Chartreuse fly
- Thread Chartreuse (UV Yellow) 210 Flat Waxed Nylon or similar
- Tail Small bucktail bunch very long, 1 saddle Hackle on each side
- Tail Flash 4 pcs reg Flashabou + 3 Opal Magnum folded to each side
- Collar 1 Large bucktail bunch about 2X skirt length on top 2/3 of hook
- Collar 2 Large Bucktail bunch about 1.5X skirt lenght, top 2/3 of hook
- Collar Flash 4 strands reg Flashabou, 4 Opal Magnum folded each side
Directions:
The VMC 7250BN has a slightly shorter shank and lighter wire that the Mustad 32608 so it sets easier. Similar Predator hooks would work well. The River Road foam cylinders are long enough to make 2 heads.
- 5/0 Hook, use 15/16 diameter cylinder
- 4/0 use 3/4 inch cylinder
- 3/0 use 5/8 in cylinder
Starting a little over 1/4 of and inch down from that mark, use a sharp blade to cut the curving face toward the near end of the cylinder. Your cut should end about 1/8 inch above the bottom rounded edge of the cylinder. Repeat this on the other end of the cylinder. You should make heads on both ends on one full length cylinder. Leave them connected for the following work.
Use 50 grit sand paper to smooth out the flat cut top and the curve on the face. Use sand paper to round off the flat top corner edges so you can wrap the prism tape around curved surfaces. The middle of the top side will remain flat. Completely finish the shape of the curved faces and the rounded edges of the flat top. Getting the shape of each head symetrical is important. The exact curvature of the face may not be critical.
Cut your combined two heads into 2 separate heads by making a vertical cut down from a dot on the center of the length of your cylinder.
Use a stout needle like tool to start a hole for the hook along the bottom round edge of the cylinder. This hole should run about 1/16 inch in from the bottom edge. Start it at the center of the "chin" of your curved face. Go in about half way across. Stick a blunted round toothpick in this hole to provide a visual target to aim a hole from the back side of the head where should hit the tip of the toothpick target.
Not as hard as it sounds. Once you can feel the toothpick wiggle from contact with the needle coming in from the other side, remove the needle and use the blunted toothpick to feel for the connecting hole and push through to finalize the connecting hole. Keep this toothpick.
Tie the tail and collars on the hook so the second collar is tied so it will fall close to the back of the foam head. Lay the head on top of your hook while you are setting up where to tie collars to match this head. The collars should be tied in hollow tie style so the hair flairs and presses against the side sof the skirt. But I don't reverse tie them. I put the 2nd collar against the bits of flared bucktail butts from the first collar. This helps flair the second collar. For collars, I use shorter, more hollow bucktail from the base of the bucktail. The collars should be slightly finger stacked, shake out the very short hairs. The second collar should be slightly shorted that the first so the body silhouette is tapered.
Use some thick cheap thread to build up the thickness of the thread base where the head will be glued on.
Measure for and Cut the rectangle of Prism Tape. Mount a head on your hook, measure from about 1/4 inch up onto the head - back to the beginning of the bend of the hook. Record this numerical measurement, cm and mm may be easier. This will be the width of the rectangle. Then use an strip of paper to wrap around the head and figure out the circumference (girth) + the overlap. This is the length. The overlap should be on the flat top side and a bit less than the truly flat width on top of the back of the head. Cut your strip of paper so it wraps around the back 1/4 inch of the head just as your prism tape will. Use this paper to mark the length of the rectangle on the waxy paper back side of the prism tape. Cut the rectangle of prism tape once you have it marked onto the waxy side.
Wrapping the prism tape around the head so the final bit lies within 1mm or where the starting edge was laid is not easy. Expect to have to unwrap it a few times and try again, torquing it during the wrap to get it to fall good enough into place. If the final corner falls on prism tape, the grip will be strong. If the final corner overhangs onto foam, this will be a weak spot. Using scissors to shorten this corner-edge so it falls on prism tape is an option. If the tape skirt comes out a bit long, it can be cut shorter where it presses against the bend of the hook.
De-Stickify the inside of the prism tape skirt. Spread a bit of glue over the inside sticky tape surface. This glue can form a bit of a reinforcing fillet bead in the inside corner where back of the foam head meats the prism tape. It also strengthens the tape a bit. Pure polyurethane "Liquid Fusion" works well, it is non toxic and rubs off skin but it may be hard to find now. Use your tooth pick to clear glue away from your hook hole channel but do not glue the toothpick into the hole!
After that dries, now glue your tied tail into the head assembly. Put glue on the forward thread base and a bit of glue in the hole perhaps. Now twist the hook and tied tail assembly into the hole. Hook eye goes in from the back side and twist it around back and forth to spread the glue around. Check that the hook is hanging vertically down from the head and set it aside to cure. This is a naturally strong and resilient assembly and any water proof glue that gives you a minute to work with will do a good job. Crafts 6000 works fine but it gels up a bit quickly.
Eyes and Gill Stripe I like two stick on foil eyes near the front edge of the prism tape and a single gill stripe on the bottom made with red nail polish. For Chartreuse heads, Silver eyes seem to work well, haven't tried gold or pearl.
This is how I make all my poppers. Without the long prism tape skirt, they are much easier. I put a short 1/4 inch hollow skirt on my Bob's Bangers which makes an neat transition form head to waist material. I use a big clump of Ice Dub for waist flash. Good colors for all these flies are White with Silver Prism Tape, Chartreuse for both tails and Prism Tape, and perhaps Black with Black Sharpy on Gold Tape for the heads.